CONT - Containerisation
Powered by
| Project Links |
|---|
| Software GitHub Repository https://github.com/ds2-eu/containerisation |
| Progress GitHub Project https://github.com/orgs/ds2-eu/projects/7 |
General Description
To allow easy and automated packaging and deployment of modules on the IDT Kubernetes runtime subcomponent environment. The containerisation module leverages on custom Helm Chart descriptors to automatically convert them into full Kubernetes Helm Charts representing the module, based on standard base templates located in the DS2 Portal Marketplace. The Helm Charts are then deployed on the IDT Module.
The Containerisation module is a core module to the IDT Broker module that enables deployment of all the DS2 modules in the IDT Broker Kubernetes sub-component. The Containerisation module uses Helm Chart standard base templates describing a DS2 module. Those templates are provisioned by the IDT Broker module and provide the standard for DS2 module deployment in IDT Broker. Base templates are stored in the DS2 Portal Marketplace. Then, when uploading a DS2 module by module developers, to the DS2 Portal Marketplace, a custom Helm Chart descriptor that includes values for those base templates needs to be provided with the module. The Containerisation module will use the descriptor together with the base templates to create the Helm Chart for the DS2 module during deployment time on the IDT Broker.
The Containerisation module can work in two different modes:
- The standard DS2 working mode: developers upload module Helm Chart Release to the DS2 Portal Marketplace. Participants use the Containerisation UI to create a Containerisation Release from the Chart Release and push it to the DS2 Portal. The Chart Controller is triggered when detecting the update of the Containerisation Release, retrieves the Chart templates from the DS2 Portal and creates the full Helm Chart and deploys it on the IDT Kubernetes Runtime sub-component
- The GitOps way: automatic deployment of the Helm Chart is triggered by the Source controller sub-component upon detecting a change on the Containerisation Release in the DS2 Portal. Then as in the previous mode, the Chart Controller creates the full Helm Chart and deploys it on the IDT. This is the deployment mode of the core IDT modules ie. Containerisation.
In both cases, the only difference is how the Helm Chart descriptor is deployed on the IDT either by the participant manually deploying the descriptor, or being automatically deployed by the Source Controller sub-component.
Architecture
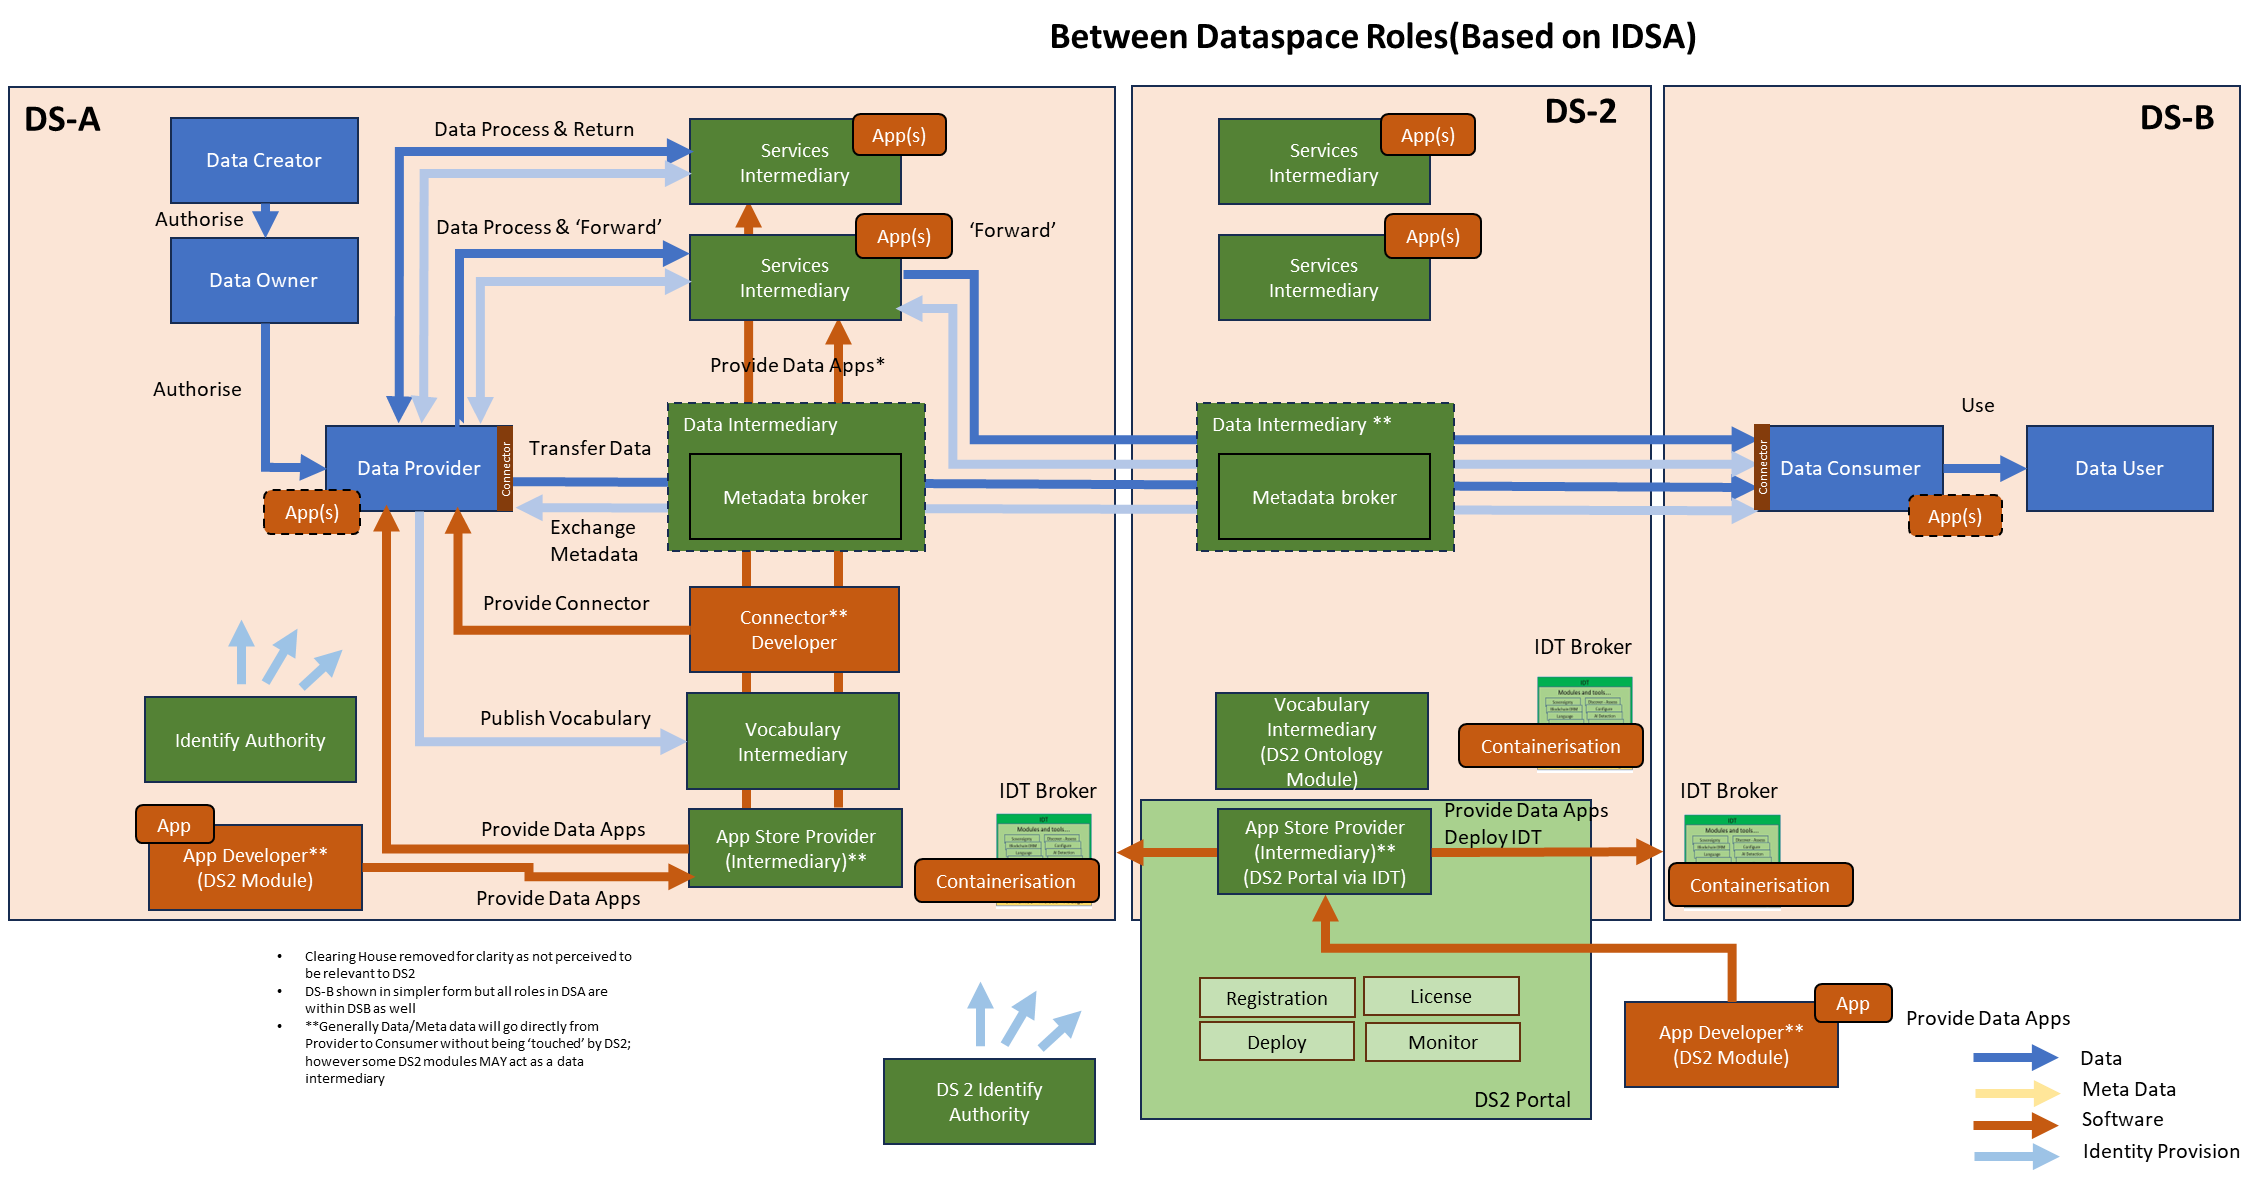
The figure below represents the module fit into the DS-DS environment.
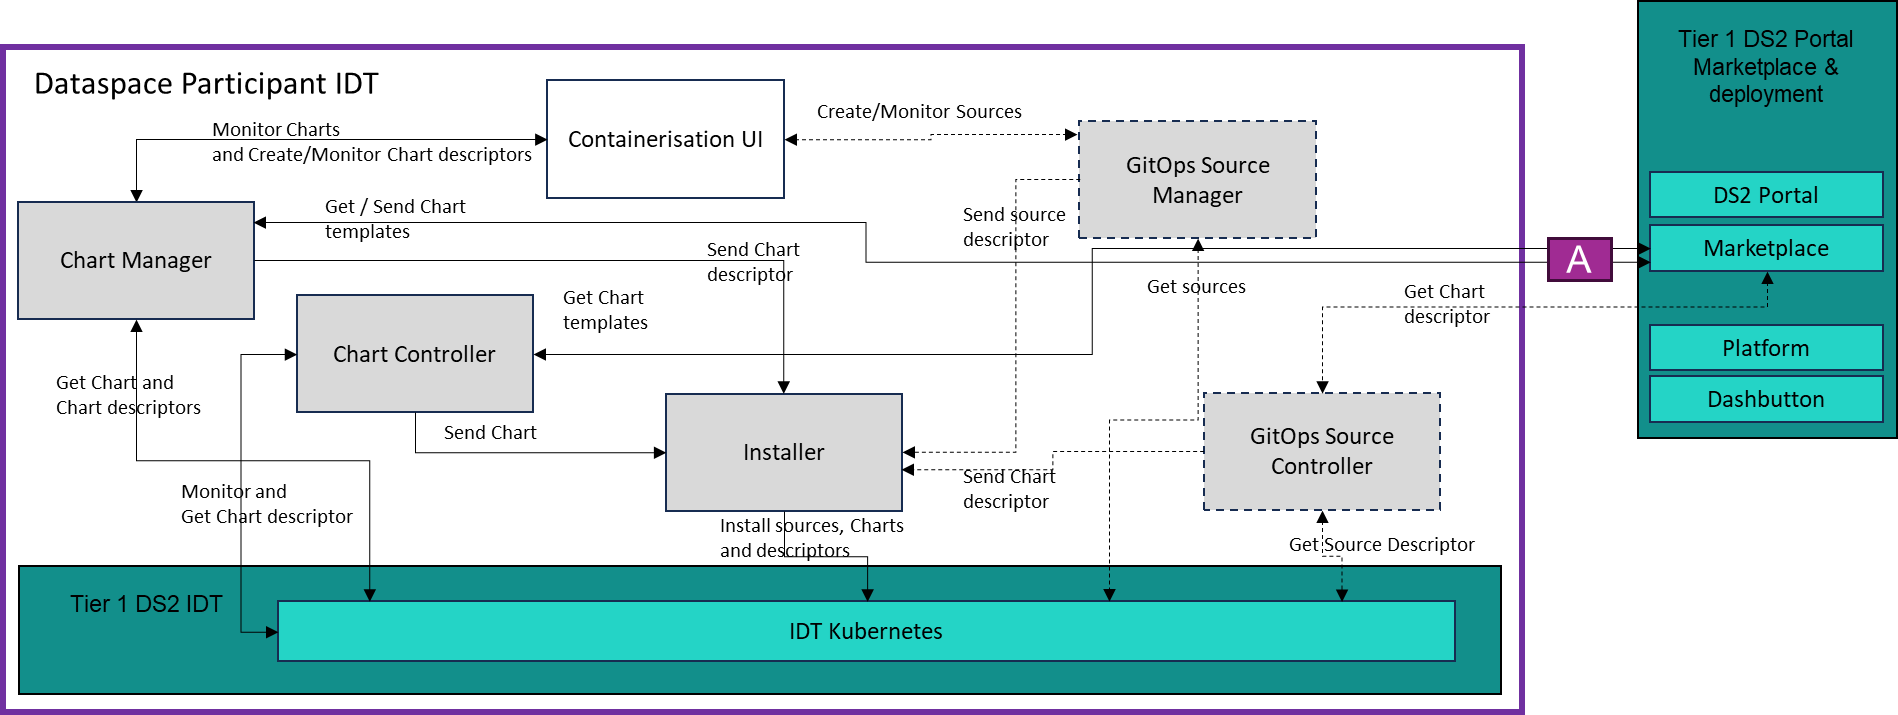
The figure below represents the actors, internal structure, primary sub-components, primary DS2 module interfaces, and primary other interfaces of the module.
Component Definition
This module has the following subcomponent and other functions:
-
ChartController: The ChartController is a Kubernetes controller, following the Kubernetes controller pattern which keeps track of a new Kubernetes custom resource definition - the “HelmChartRelease Descriptor”. When changes are detected on a release, ie. addition, update, the Controller connects to a configured location ie. GitHub repository, to download the corresponding Helm Chart base templates. Then, together with the HelmChartRelease, the Chart Controller will create a full Helm Chart describing the module. This Helm Chart will be deployed into the IDT Kubernetes Runtime subcomponent using the Installer component. The ChartController is based on The HelmController from Flux The GitOps Toolkit and embeds the Installer component for Helm Charts.
-
ChartManager: The ChartManager is mainly used to monitor the Helm Charts and HelmChartReleases deployed in the system. It will query the IDT Module’s Kubernetes subcomponent to retrieve current Charts and descriptors. The Chart Manager can also be used to create a HelmChartReleases using some input parameters and install it via the Installer component. Once installed, the ChartController will detect the new ChartRelease and will convert it to a Chart deploying it back into the IDT Module’s Kubernetes subcomponent.
-
Installer: This is the component responsible for installing Helm Charts and HelmChartDescriptors in the IDT Kubernetes subcomponent. It will receive the corresponding Helm Charts and Helm Chart Base Templates and will apply them in the IDT Kubernetes subcomponent. The Installer also takes care of installing new Sources created by the Source Manager component. The Installer has been merged into the ChartController and SourceController both based on Flux, but for the sake of simplicity is kept as a separate component in the architecture diagram.
-
Containerisation UI: This is the main module UI that allows users to monitor current existing Charts, ChartReleases and Sources in the system. Users will have an overview of what is installed in the system and its current status regarding to those specific resources. The UI can also be used to create, update or delete ChartReleases via the ChartManager and Sources via the Source Manager.
-
GitOps Source Controller: The Source Controller, similar to the ChartController, is a Kubernetes controller that keeps track of the custom resource definition Source. A Source mainly represents a reference to a repository where Chart Templates are stored. The Source Controller monitors the status of the Source and reacts to changes by reflecting those changes in the IDT Kubernetes subcomponent. The Source Controller is an optional subcomponent, and users can just install the Charts using the IDT or via Kubernetes standard kubectl. The Source Controller, as the Chart Controller, is based on the Source Controller from Fluxt The GitOps Toolkit, and embeds part of the Installer component.
-
(DS2) GitOps Source Manager: The Source Manager, similar to the ChartManager is mainly used to monitor the Source in the system and is customised to DS2. It can also be used to create, update, and delete new sources that will be installed via the Installer component. As the Source Controller, this is an optional component.
-
Tier 1 Service Stack for Marketplace and deployment and API: The full stack will be implemented as generically described elsewhere in this document. Exceptions: This module runs in the IDT and uses the IDT Kubernetes subcomponent for Chart and ChartRelease installations. The DS2 Portal Marketplace component and its repository system is used to store the Chart base templates and releases. Since the DS2 Portal is also a DS2 module, it is deployed and run on the IDT, so Containerisation module can also be used for the DS2 Portal and other intermediary services.
Screenshots
The Containerisation UI development has not yet been started, so no screenshots.

Commercial Information
| Organisation (s) | License Nature | License | Marketplace Link |
|---|---|---|---|
| ICE | Open Source | Apache 2.0 | CONT |
Top Features
- Kubernetes Native: The CONT module is a Kubernetes native solution based on open-source system Flux and The GitOps Toolkit
- Kubernetes Application Deployment Control: Provides control to Kubernetes administrators or SREs over what and how a module or application is deployed on a given Kubernets cluster ie. IDT2.
- Kubernetes Application Abstraction: The CONT module abstracts developers from the Kubernetes complexity when creating a Kubernetes application, leveraging on a templating system based on Helm Charts and Flux HelmRelease CRD
- Helm Chart Templates: Ability to create Helm Chart templates for different types of applications
- Helm Release CRDs Templates: Based on the HelmRelease CRDs from Flux, the CONT module enables the creation of HelmRelease templates that will make use of the Helm Chart Templates
- Application Management using API: Manage application (module) lifecycle (create, install, uninstall, delet) using the CONT Chart Manager API
- Containerisation UI: Manage the Containerisation module using a modern web based UI
- Operator vs Developer View: Access the Containerisation module features with different views depending on the role Operators vs Developer
How To Install
The Containerisation module is part of the IDT installation, but can also be installed standalone for development tests.
Requirements
The IDT or a Kubernetes cluster and Helm is required. This component can't be installed without a Kubernetes cluster, in fact, the goal of the component is to deploy the modules on the Kubernetes cluster.
Software
Containerisation module so far installs these software utilities and specific tested compatible versions:
- Flux Helm Controller (Chart Controller + Installer)
- Flux Source Controller (Source Controller)
- Flux Notification Controller (default)
- Flux Kustomization Controller (default)
- Containerisation Backend
- Chart Manager
- Source Manager
- Containerisation UI
DS2 Installation
The Containerisation module is deployed as a core module along with the IDT installation so users don't need to run a separate installation. More details to update the module in the How To Use section.
Standalone Installation
The Containerisation module is not meant to be installed standalone, but for testing purposes users can install Containerisation standalone on top of the IDT or a Kubernetes cluster
Summary of installation steps
-
Clone the repo containerisation
-
Create the platform side configuration
-
Install the Containerisation module by running the installfluxghorg.sh script
Detailed steps
-
Clone the repo containerisation
-
Create the platform configuration by running the kubernetes_configuration.sh script. The Helm templates to be used by the Containerisation module rely on a platform configmap and secret that are created in this step and contain platform configuration
imagepath: The registry path where the docker images are stored ie. in ghcr.io/ds2-eu/ds2charts/image the imagepath would be ds2eu/ds2charts
github_user: The admin user for the customer organisation registered in the DS2 Portal
github_token: The admin user token retrieved from the DS2 Portal
organisation_domain: The user organisation domain for the modules urls ie. customer.domain.com
namespace: The namespace where to create the configmap and secret ie. icekube
An example of running the script
-
Install the Containerisation module by running the installfluxghorg.sh script : So far the Kubernetes controllers are available, which will deploy a template helm chart from a helmrelease CRD
github_token: a GitHub user token. This is a personal access token that has access permissions to the org repository
github_organisation: a GitHub organisation. This will be in a later stage the organisation from the Marketplace ie. ds2-marketplace where modules are stored
github_repository: this is the name of a repository in the GitHub organisation. This will be in a later stage a repository of the organisation id of the participant as registered in the Portal. The repository is created via the Marketplace and the acquired modules will be located in that GitHub repository. This is linked to the Marketplace purchase process
An example of running the script
-
Install the core IDT modules. To do this, run the copy_charts script. This will install and customize the core modules of the IDT. Only Containerisation UI and Backend are copied. For all core modules installation run the IDT installer.
github_user: The admin user for the customer organisation registered in the DS2 Portal
github_token: The admin user token retrieved from the DS2 Portal
github_organisation: a GitHub organisation. This will be in a later stage the organisation from the Marketplace ie. ds2-marketplace where modules are stored
user_organisation (github_repository): the name of the organisation which must be the same as the GitHub repository name created for that organisation
organisation_domain: The user organisation domain for the modules urls ie. customer.domain.com
An example of running the script
Now the Containerisation UI can be accessed at https://containerisationfrontend.$organisation_domain .
How To Use
Containerisation module is meant to be used in three different ways: * As a user: to deploy modules on the IDT * As a developer: to create the Containerisation charts for the modules being deployed * As an Operator (or Cluster admin): to create the Chart templates that dictate how a module (an application) is deployed on a cluster
As a User
The main use of Containerisation is to deploy or delete the modules, acquired from the Marketplace, on the IDT.
Deploy a Module
-
Once a module has been purchased from the DS2 Marketplace, navigate to the Containerisation UI, in the Git Repositories section and refresh the repository.

-
The new module purchased will be available in the Available Modules section

-
Click on the module and click on install, then click on next and fill in the required paramters (this dependes on each module to configure the module). Then click on Install Module Button

-
The module is now being installed

-
The module is now installed and you can access to it from the Containerisation Installed modules View Module or from the Dash Button

Delete a Module
-
Navigate to the installed modules and click on the three dots on the top right side of the module card and click uninstall module

-
The module will transition to a deleted state while all Kubernetes resources related to the module are deleted. Once deleted the module will be removed from the installed modules. A deleted module can be re-installed from the available modules list using the Deploy a Module process.

Update a Module
The Containerisation module supports updating a module by deleting the current installed module and installing the new version from the available modules.
- Delete the module
- Acquire the new version from the Marketplace. This will override current module version with the new one in the available modules
- Refresh the Git Repository in the Git Repository UI
- Install the new module from the available list
Follow the presented exact order to update a module ie. delete current version before acquiring the new one from the Marketplace, since due to the behaviour of Flux with Git Repositories as sources, if the module is acquired from the Marketplace before being deleted, the module will be auto-updated by Flux. This would not be a problem unless there is a change on the required input parameters for the module. In this case, if module is auto-updated, those new paramters will get their default values and won't be configured by the users
As a Developer
Containerisation does not support creating the module charts from the UI and it requires manual creation using a code or text editor. Future development of a flow to create those charts from the UI is planned in the Containerisation Roadmap.
Manual Module Chart Design
To manually prepare the module chart to be uploaded to the Marketplace and deployed using the containerisation modul,e first create the HelmRelease chart using the demomodule4 template in the helmreleases repository at demomodule4/.
- Clone the repository and copy the folder to another folder named after the module name ie. mymodule. This will be the module chart.
-
Change the name and the version in the Chart.yaml file with the module name and version. You can edit the file or use sed
-
Navigate to the templates folder of the module chart
-
Duplicate the helmrelease.yaml file as per the number of components in your module and delete the original helmrelease.yaml. This means, if your module includes a backend and a frontend, you need two helmreleases, if there is also a database, three helmreleases and so on. Name the files with the name of the module and component ie. mymodulebackend, mymodulefrontend ... Don't use '-' or similar characters. You can see an example of a two components module in the helmreleases repository at demomodule2 folder with a backend and frontend components.
-
Change the reference to demomodule4 by the module name in the _helpers file
-
Edit the components helmrelease files in order to use the component name. An example of the backend where the name and values.app.name are changed. Repeat this step with every component.
kind: HelmRelease metadata: name: {{ .Release.Name }}-mymodulebackend -> Changed this with suffix mymodulebackend namespace: {{ .Release.Namespace }} spec: interval: 10m chart: spec: chart: ./charts/ds2modulebase4 version: '1.0.0' sourceRef: kind: GitRepository name: ds2charts namespace: ds2 interval: 10m values: module: name: {{ .Release.Name }} -> Leave as it is app: name: mymodulebackend -> Changed this to mymodulebackend port: 80 -> Change this to the docker container port of the component. This is the port you use to expose the component in the docker image. env: true -> set to true if you need to add extra configuration environment variables to the component otherwhise set to false image: name: nginxmessage -> Change this to the docker image name of the component tag: "1.0.0" -> Change this to the docker image tag of the component service: port: 8080 -> Change this port only if you want to expose the Kubernetes cluster ip through another port. {{- toYaml .Values.mymodulebackend | nindent 4 }} -> Change to .Values.mymodulebackend or if your module does not have extra configuration, REMOVE THIS -
Add persistence to a component. If a module's component needs persistence ie. a database, add the persistence section to the helmrelease file in the values section:
Only hostpath persistence is supported by IDT so far. Future development is in the roadmap to support other persistence types such as NFS or OpenEBS... values: module: name: {{ .Release.Name }} app: name: mymodulebackend port: 80 env: true image: name: nginxmessage tag: "1.0.0" service: port: 8080 persistence: -> add this persistence section enabled: true -> enabled to true storage: 5Gi -> add how much storage needed for the module path: "/idt/mymodule/mymodulebackend" -> the path of the local filesystem of the IDT needs to follow the convention /idt/modulename/componentname mountpath: "/data/backend" -> the module component docker container persistence path depends on the component {{- toYaml .Values.mymodulebackend | nindent 4 }} -
Add extra configuration to the chart. If a module's component needs some configuration from the end user, set the values.app.env to true in the helmrelease file.
Leave the last line of the helmrelease as it is
Navigate back to the main chart folder (cd ..) and edit the values. In the example we add configuration to two components in the module, with the same variable name WELCOME_MESSAGE. If a variable is a bool with values true or false, double or single quote the value ie. myvariable: "true"
mymodulebackend: -> Change this to the module component
  config:
    WELCOME_MESSAGE: "The flux containerisation helm chart nginx message backend" -> Add here as many variables as you may have as a key value pair
mymodulefrontend: -> Chnage this to another module component
  config:
    WELCOME_MESSAGE: "The flux containerisation helm chart nginx message frontend" -> Add here as many variables as you may have as a key value pair
-> Add more components to the module
- With this, the module is ready. Follow the Marketplace intructions to upload the Chart and images.
As an Operator
Operators or administrators of Kubernetes clusters are the ones in charge to develop the Containerisation Base Chart Templates. Those are the Charts that dictate how a module or application will be deployed on the cluster. In the case of DS2, the Operators are the DS2 Operators running the intermediary services Portal and Marketplace, dictating how the modules will be deployed on the local IDT Kubernetes cluster.
Containerisation does not support creating the Base Chart Templates from the UI and it requires manual creation using a code or text editor. Future development of a flow to create those charts from the UI is planned in the Containerisation Roadmap.
Manual Base Chart Design
Designing a Base Chart is no different from designing a regular Helm Chart. The Base Chart contains all the core resources needed by Kubernetes to deploy a module component: deployment, service, imagepullsecret, ingress, configmap, secret, serviceaccount, persistentvolume and persistentvolumeclaim, etc. This depends on specifics of the platform where modules will be deployed ie. support for specific storage type, ingress type, etc.
For DS2, some Base Charts have been created in the helmtemplates repository, in the charts/ folder. The core ones for modules are: * ds2modulebase3: meant for local tests * ds2modulebase4: meant for marketplace publishing
Those two Base Charts include the Kubernetes resources required for a module to be deployed on the IDT and are designed in a generic way using Helm Chart templating, to support customization during design and deployment time, when creating the Module Chart referencing the Base Chart ie. name of the module, image, etc.
The two Base Charts support 90 % of a typical web application (DS2 modules) composed by frontend, backend and database, but for cases when this is not enough and the module requires very specific configuration and deployment needs, specific Base Charts can be created, tailored to the module needs. Then the Module Chart is created referencing this new specific Base Chart. This has been the case for the DS2Connector chart and the Containerisation modules.
If you need a specific Base Chart for DS2, contact the DS2 Operator in order to provide the new Base Chart.
Tips For Best Containerisation Integration
- Testing the charts before uploading to the Marketplace
- Install a local IDT as per the IDT Installation Guide
- Change the reference of the basechart from ds2modulebase4 to ds2modulebase3
- Push the chart to your IDT organisation repository at the charts/ folder. This is the repository created by the Portal when registering the organisation which is the organisation configured when installing IDT
- Push the docker images for the module to the ds2 GitHub. For DS2, the docker images for the modules need to be pushed to github using ds2charts image path. An example of an image in the ds2charts image path > ghcr.io is the registry > > ds2-eu/ds2charts is the path > > nginxmessage:1.0.0 the image name and version
- Navigate to the Containerisation UI, refresh the Git Repository and Install the module from the available modules.
-
If local installation runs ok, the module is ready to be uploaded to the Marketplace. Change the basechart reference back to ds2modulebase4
-
Building your images: The images will run on top of the IDT, and the IDT runs a Kubernetes cluster on Linux, typically Ubuntu server, so you need to build your images for Linux/amd platform. That is mainly for those developing usin MacOS. The better option is to build the images on a Linux server.
- Backend URL: A typical issue is to generate the backend URL from the frontend. Since modules will be deployed on top of the IDT, and the IDT will be deployed on-premise for different customer organisations, thus using different domains for the module URLs, the Helm Chart templates are configured to use a platform configuration that contains the organisation domain. This platform configuration is stored in Kubernetes and is created during Containerisation installation. The Helm Chart templates are also configured to create by default an ingress that will expose an https URL for the different components ie. frontend, backend. The component URL is automatically created by joining the component name with the domain, so for instance, if a component is called mymodulefrontend, and the domain for the organisation is myorg.com, the ingress URL of that component is https://mymodulefrontend.myorg.com. So to generate the backend URL dynamically from the frontend, the recommended approach is from the frontend to obtain the domain using the frontend URL and then use the component name which is static, and what you configured as name for the component in the chart. An example of how to do this for dhsare:
let host = window.location.host; let hostname = window.location.hostname; host = hostname.replace(/^dsharefrontend\./, ""); --> where dsharefrontend is the name of the dshare frontend component app.config.globalProperties.$apiBase = `${protocol}//dsharebackend.${host}`; --> where dhsarebackend is the name of the dshare backend component -
Database connection string: Another typical issue is how to access a database or any internal component that is not being exposed via internet. In this case it is assumed that best practices are being followed and the database is not exposed using ingress and the frontend is only accessing the database via a backend API. The Helm Chart templates are configured to expose the dabase in the cluster using the component that you configured in the chart. The port is the one being exposed by the service, in the example above of the helmrelease file it's the service.port: 8080 from the values. You can set this port to any port and then that's the one you use for accessing the database. So an example of a helmrelease for a database:
With this configuration, the url to access mysql would be jdbc:mysql://mymoduledb:3300/dbname where dbname is the name of the database in the image.... values: app: name: mymoduledb -> Changed this to mymodulebackend port: 3306 -> This is the port in the image env: true image: name: mysql -> Change this to the docker image name of the component tag: "1.0.0" -> Change this to the docker image tag of the component service: port: 3300 -> This is the port used to expose the service to the cluster ... -
Ingress Enable/Disable: As discussed in the previous step 5, when creating the helmrelease file for a component, you can add some additional variables in the values from the Helm Chart template. One of those variables enables or disables the creation of an ingress URL to expose the component outside the cluster. Usually ingress will be enabled for frontend and backend components that need to be accessed outside the cluster, and is enabled by default. For components like databases and others that don't need to be accessed from outside the cluster, you can disable the ingress by adding the variable ingress.enabled and set to false:
-
Manual Module Deployment: Users can manually deploy a module by pushing the ContainerisationRelease to the organisation GitRepository without using the Containerisation UI. This is only intended for development tests and not recommended for production environments.
To manually install a module, assuming IDT is already running and Containerisation has been installed following the instructions above, users can create their own Containerisation HelmRelease Yaml File and push it to the repository where the containerisation controllers have been configured during installation. In the next example the organisation fluxtest is used as an example of an organisation using Containerisation to deploy a demo module. Replace fluxtest with your organisation.
-
Create the
repository in GitHub and create a personal access token with permissons to read/write the repository Replace
with your organisation -
IDT, Configuration, Flux, DS2 GitRepository and Containerisationhas have been installed The DS2 GitRepository is created during IDT installation. This is a Flux resource that monitors the Helm templates folder at helmtemplates repository in ds2 and a namespace resource where this GitRepository will be created. This is the configuration of the GitRepository in the clusters/my-cluster/ds2 folder of your organisation repository gitrepository.yaml file
namespace.yaml file kustomization file kustomization.yaml
Run this command to inspect the ds2 gitrepository in the vm where idt is installed:

-
Once everything is installed, containerisation is configured to monitor changes in the
repository, and the folders /cluster/my-cluster/flux-system are created. In the flux-system folders there are already some yaml files which are the components from Containerisation flux itself, This can't be modified -
Push the module chart to the
repository to simulate what would happen when a module is purchased from the Marketplace, and copied to the organisation repository
Clone the helmreleases repository Copy the module chart to therepository and push it to the repository in the charts folder. If the charts folder does not exist yet, create it. The module won't be deployed yet. -
Create the Containerisation Helm Release Yaml file, the namespace file and the kustomization file Create the helmrelease-demomodule.yaml with the values overriding any variable that needs to be configured. These variables are the ones in the values.yaml file of the module chart. If a variable is a bool with values true or false, double or single quote the value ie. myvariable: "true"
You can copy the helmrelease-demomodule.yaml from the helmreleases repository in the releases/demomodule/ folder.kind: HelmRelease metadata: name: demomodule --> Change this to the name of the module namespace: demomodule --> Change this to the name of the module spec: interval: 10m chart: spec: chart: ./charts/demomodule --> Change this to ./charts/name of the module version: '1.0.0' --> Change this to the version of the module as per the version in the Chart.yaml file of the module chart sourceRef: kind: GitRepository name: flux-system namespace: flux-system interval: 10m values: demomodulecomponent1: --> Change this to a module component config: WELCOME_MESSAGE: "COMPONENT1" --> Change this according to the variables of values.yaml file of the module chart. You can change the value.
Create the namespace-demomodule.yaml You can copy the namespace-demomodule.yaml from the helmreleases repository in the releases/demomodule/ folder. Create the kustomization fileYou can copy the kustomization.yaml from the helmreleases repository in the releases/demomodule/ folder. Copy the yaml files to the fluxtest/cluster/my-cluster/releases/demomodule/ folder and push the repository. If the releases and demomodule folders do not exist yet, create them. The module will be deployed after some seconds automatically by Containerisation Flux component. Run the following command to check the helmreleases are installedkind: Kustomization resources: - namespace-demomodule.yaml --> Change this to namespace-nameofthemodule.yaml - helmrelease-demomodule.yaml --> Change this to helmrelease-nameofthemodule.yaml You can see there are two charts created, the demomodule helmchart which corresponds to the Containerisation HelmRelease and the demomodule-demomodulecomponent1 which is triggered by the first one and expanded to a full chart using the templates from the modulebase chart.
Run the following command to check the pod is running
You can see there are two charts created, the demomodule helmchart which corresponds to the Containerisation HelmRelease and the demomodule-demomodulecomponent1 which is triggered by the first one and expanded to a full chart using the templates from the modulebase chart.
Run the following command to check the pod is running
 The modulebase chart also creates an ingress to access the module. Run the following command to retrieve the ingress url
 Run the following command to test access to the module
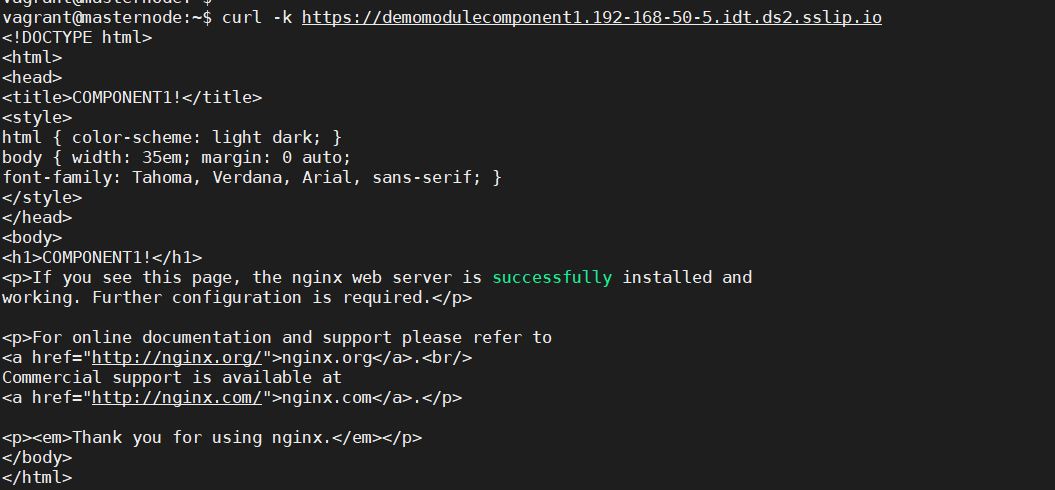 Your ip will be different depending on the domain congfigured during installation when the platform_configuration was created.
If you want to deploy another module, using the same templates but with a different name, just for testing purposes, repeat the previous steps but replacing demomodule by the new module name. Place the module chart in the charts/ folder, the release in the releases folder, and the module will automatically be deployed by Containerisation Flux.
Other Information
No other information at the moment for Containerisation
OpenAPI Specification
N/A
Video
Additional Links
Flux https://fluxcd.io/
Helm https://helm.sh/docs/topics/charts
Containerisation Repository https://github.com/ds2-eu/containerisation (Private Link for Project Members)